Total 202 Questions
Last Updated On : 12-Jun-2026
Preparing with Salesforce-Platform-Developer-II practice test 2026 is essential to ensure success on the exam. It allows you to familiarize yourself with the Salesforce-Platform-Developer-II exam questions format and identify your strengths and weaknesses. By practicing thoroughly, you can maximize your chances of passing the Salesforce certification 2026 exam on your first attempt. Start with free Salesforce Certified Platform Developer II (SP25) sample questions or use the timed simulator for full exam practice. Surveys from different platforms and user-reported pass rates suggest Salesforce Certified Platform Developer II (SP25) practice exam users are ~30-40% more likely to pass.

A developer is working on an integration between Salestorce and an external system. The integration requires sending a large amount of data to the external systern, which can cause long response times and timeouts. To optimize the performance and avoid timeouts, which technique should be used?
A. Use a chained batch Apex to split the data into smaller batches.
B. Implement an asynchronous callout using the Continuation class,
C. Increase the timeout limit in the callout options,
D. Use the @future annotation to make the callout asynchronous.
Explanation:
To integrate Salesforce with an external system when dealing with large data volumes and long response times, it's crucial to choose an approach that allows the system to handle delays gracefully without hitting governor limits or timeouts.
✅ Correct Answer: B. Implement an asynchronous callout using the Continuation class
The Continuation class is designed specifically for long-running callouts in Visualforce controllers or Aura-enabled Apex controllers. It enables Salesforce to make asynchronous callouts that can wait up to 120 seconds, much longer than the standard 10-second or 60-second limit for synchronous callouts.
Key benefits:
➜ Prevents request timeouts by suspending the server-side processing.
➜ Enables non-blocking behavior in the UI.
➜ Ideal for large data transfers or slow external APIs.
❌ Option A: Use a chained batch Apex to split the data into smaller batches
Chained batch Apex is useful when processing or transforming large datasets within Salesforce or sending multiple independent requests, but does not support HTTP callouts directly within a batch unless you’re careful.
➜ While you can make callouts from the execute() method, it's limited to one callout per batch execution.
➜ It still suffers from timeouts for large or slow callouts.
➜ Not ideal for UI-driven real-time integrations.
❌ Option C: Increase the timeout limit in the callout options
Salesforce allows setting timeouts for callouts using setTimeout() on the HttpRequest object (max 120 seconds), but this alone is not enough. In synchronous Apex (e.g., standard triggers or controller methods), the total request time is capped (typically 10–60 seconds), regardless of the timeout you set.
➜ So increasing timeout won't help if you're hitting platform limits.
➜ Still prone to governor limits and timeouts.
❌ Option D: Use the @future annotation to make the callout asynchronous
While the @future annotation does support callouts, it has several limitations:
➜ You cannot return a response to the user session (e.g., Visualforce or Lightning).
➜ Limited to single method parameters and static methods.
➜ Not ideal for long-running or user-interactive processes.
➜ It's useful for simple fire-and-forget operations, but not for handling large responses or avoiding timeouts with interactivity.
📚 References:
Salesforce Developer Guide: Continuation Class
Trailhead: Asynchronous Apex
Best Practices for Callouts
A developer is inserting, updating, and deleting multiple lists of records in a single transaction and wants to ensure that any error prevents all execution. How should the developer implement error exception handling in their code to handle this?
A. Use Database methods to obtain lists of Database.SaveResults.
B. Use a try-catch statement and handle DML cleanup in the catch statement,
C. Use Database.setSavepoint {} and Database.rollBack with a try-catch statement.
D. Use a try-catch and use sObject.addError() on any failures.
Explanation:
When a developer is performing multiple data manipulation operations—such as inserting, updating, or deleting lists of records—in a single transaction, maintaining data integrity is crucial. This means that either all operations should succeed or none at all. If any one of the operations fails, the system should revert to the original state as if nothing had happened. This is the foundational principle of atomicity in transactional systems.
The correct way to enforce this behavior in Salesforce Apex is to use a combination of Database.setSavepoint() and Database.rollback() within a try-catch block. This allows the developer to define a specific point in time (a "savepoint") before any DML (Data Manipulation Language) operations are performed. If an exception occurs at any point during the sequence of operations, the code within the catch block can execute a rollback to that predefined savepoint, effectively undoing all the changes made after the savepoint was set. This ensures that the database remains in a consistent state and that no partial or unintended data changes occur.
This approach is especially important in complex business logic where multiple objects or large sets of data are involved, and the failure of even one operation should invalidate the entire transaction. Without this mechanism, Apex's default behavior would only roll back the operation that failed, while any previous successful DML statements would remain committed—leading to inconsistent data.
To reinforce:
→ Savepoints provide manual control over transaction checkpoints.
→ Rollbacks to a savepoint undo all operations that occurred after it.
→ This method guarantees all-or-nothing execution within a single transaction.
Using Database.setSavepoint() and Database.rollback() not only improves error resilience but also aligns with best practices for ensuring data consistency and system reliability in enterprise-level Salesforce applications.
As part of a custom interface, a developer team creates various new Lightning web
components. Each of the components handles errors using toast messages. When the
development is complete, all the components are added to the same Lightning page.
During acceptance testing, users complain about the long chain of toast messages that
display when errors occur loading the components.
Which two techniques should the developer implement to improve the user experience?
(Choose 2 answers)
A. Use a Lightning web component to aggregate and display all errors
B. Use the window.alert() method to display the error messages
C. Use a
D. Use public, properties on each component to display the error messages.
Explanation:
When multiple Lightning Web Components (LWCs) independently fire toast notifications for error handling, it leads to a poor user experience — especially when they're stacked together on a single page. It becomes overwhelming and unclear.
✅ A. Use a Lightning web component to aggregate and display all errors
➟ Creating a centralized error handling component helps consolidate and display error messages in one place.
➟ Each component can emit error events to the parent/aggregator, which then decides how and when to display the messages.
➟ This avoids multiple toasts popping up at once and makes error messages manageable and user-friendly.
✅ C. Use a
➟ This tag is designed to display validation or error messages directly in the UI, next to form fields or the component that caused the issue.
➟ It's a better UX pattern than pop-up toasts, especially in multi-component layouts.
❌ B. Use the window.alert() method to display the error messages
➟ window.alert() is a blocking pop-up that interrupts user flow.
➟ It's not recommended in modern web app design and is not Lightning-friendly.
❌ D. Use public properties on each component to display the error messages
➟ Public properties (@api) are meant for data passing between components, not for UI display of errors.
➟ This approach doesn't help centralize or manage error messaging across multiple components.
📚 Reference:
Lightning Web Components Best Practices – Error Handling
Salesforce Toast vs Inline Messages
✅ Final Answer:
A. Use a Lightning web component to aggregate and display all errors
C. Use a
A developer writes a Lightning web component that displays a dropdown list of all custom objects in the org from which a user will select. An Apex method prepares and returns data to the component. What should the developer do to determine which objects to include in the response?
A. Check the isCustom() value on the sObject describe result.
B. Import the list of all custom objects from @salesforce/schema.
C. Check the getobiectType [) value for ‘Custom’ or "Standard’ on the sObject describe result.
D. Use the getcustomobjects() method from the Schema class.
Explanation:
✅ Correct Answer: A. Check the isCustom() value on the sObject describe result
The correct approach for identifying custom objects in Salesforce is by using the isCustom() method on the results obtained from the sObject Describe API. This method is part of the DescribeSObjectResult class in the Apex Schema namespace and returns a Boolean value that tells whether a particular object is custom (true) or standard (false). When a developer writes an Apex method to support a Lightning Web Component (LWC) that displays a dropdown list of only custom objects, the Apex code would typically use the Schema.getGlobalDescribe() method to retrieve a map of all sObjects in the org.
Then, for each object, the developer would call describe() to get its metadata and invoke isCustom() to filter only those with a true result. This method is both reliable and native to Salesforce's metadata introspection tools, making it the most appropriate way to dynamically identify and return only custom objects. This enables the LWC to display only the relevant options without hardcoding any object names or relying on schema imports, which could become outdated or inflexible.
❌ Option B: Import the list of all custom objects from @salesforce/schema
This option is incorrect because importing objects using the @salesforce/schema directive in LWC is designed for statically referencing individual fields or objects, not dynamically listing them. In other words, @salesforce/schema requires that the object or field be explicitly named at design time, and it cannot be used to retrieve a complete or dynamic list of all custom objects.
Moreover, @salesforce/schema is a compile-time construct, which means it does not support the level of runtime introspection that is needed for a component meant to list all custom objects in a flexible and dynamic way. Using this approach would defeat the purpose of using Apex for dynamic metadata access, and it would require hardcoded imports for every potential custom object, which is both impractical and non-scalable in real-world Salesforce orgs.
❌ Option C: Check the getObjectType() value for 'Custom' or 'Standard' on the sObject describe result
This option is incorrect because the getObjectType() method in Salesforce Apex does not return a string indicating whether the object is "Custom" or "Standard." Instead, getObjectType() returns an instance of Schema.SObjectType, which refers to the type of the object but not its classification as custom or standard.
Therefore, there's no way to extract a direct textual label like "Custom" or "Standard" from getObjectType(). This makes the approach described in this option technically invalid for the purpose of distinguishing between custom and standard objects. The only correct and supported method to achieve this is isCustom(), which directly returns a boolean indicating the object type.
❌ Option D: Use the getCustomObjects() method from the Schema class
This option is incorrect because the Schema class in Apex does not have a method called getCustomObjects(). While the Schema namespace provides powerful reflection capabilities, such as getGlobalDescribe() and various describe calls on individual objects and fields, there is no method specifically designed to return only custom objects in one call.
Developers must retrieve all sObjects using Schema.getGlobalDescribe(), and then programmatically filter them using describe().isCustom() for each entry. The method described in this option simply does not exist, which makes it technically incorrect and misleading in a Salesforce Apex context.
Reference:
Apex Reference Guide
Apex Describe Information
A developer created a Lightning web component for the Account record page that displays
the five most recently contacted Contacts for an Account. The Apex method,
Contacts, returns a list of Contacts and will be wired to a property in the component.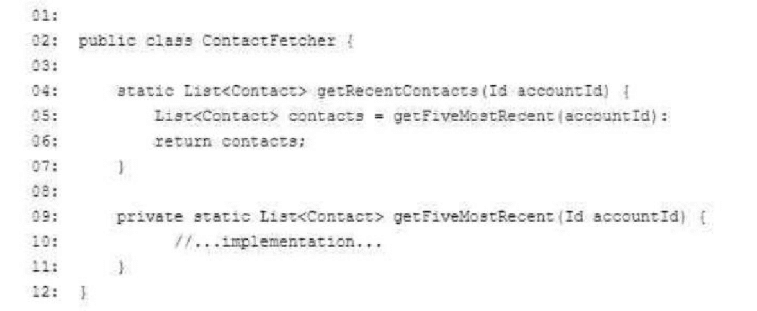
Which two lines must change in the above code to make the Apex method able to be
wired?
A. Add @AuraEnabled {cacheable=trues) to line 08.
B. Remove private from line 09.
C. Add public to line 04.
D. Add @AuraEnabled {cacheable=true) to line 03.
Explanation:
To make the Apex method getRecentContacts wireable to a property in a Lightning Web Component (LWC) for the Account record page, which displays the five most recently contacted Contacts, the method must meet specific requirements for LWC integration. The code provided is an Apex class ContactFetcher with a public static method getRecentContacts that calls a private static method getFiveMostRecent. Let’s analyze the requirements and evaluate the options.
Requirements for Wiring Apex to LWC:
➤ The Apex method must be annotated with @AuraEnabled(cacheable=true) to be called from an LWC using the @wire decorator. This annotation ensures the method is cacheable, improving performance by reducing server calls, and makes it accessible to the Lightning framework.
➤ The method must be static and accessible (e.g., public or global) to be invoked from LWC.
➤ The current code has getRecentContacts as static and public, which satisfies the accessibility requirement, but it lacks the @AuraEnabled(cacheable=true) annotation.
Analysis of the Code:
➤ Line 03: public class ContactFetcher { - The class is public, which is sufficient for LWC access.
➤ Line 04: static List
➤ Line 06: List
➤ Line 09: private static List
Evaluation of Options:
A. Add @AuraEnabled(cacheable=true) to line 08.
Line 08 is the opening brace { of the getRecentContacts method, which is not a valid place for an annotation. Annotations like @AuraEnabled(cacheable=true) must precede the method declaration (e.g., on Line 04). This option is incorrect due to improper placement.
B. Remove private from line 09.
Line 09 defines private static List
C. Add public to line 04.
Line 04 already has public static List
D. Add @AuraEnabled(cacheable=true) to line 03.
Line 03 defines the class public class ContactFetcher {, and annotations like @AuraEnabled are not applicable to class declarations—they are used on methods or variables. This option is incorrect due to incorrect application of the annotation.
Correct Answer: None of the options directly match the ideal solution based on the provided choices. However, the intent seems to be identifying changes to make getRecentContacts wireable. The correct change should be to add @AuraEnabled(cacheable=true) to Line 04, but this is not explicitly listed. Let’s reconsider the options:
➜ The closest logical interpretation, given the options, suggests a misunderstanding in the question’s numbering or options. Typically, the correct change would be to modify Line 04 to include @AuraEnabled(cacheable=true) (e.g., public static List
Re-evaluation:
➡️ A is the closest in intent (adding @AuraEnabled(cacheable=true)), but the line number (08) is wrong—it should be 04. This might be a typo in the question.
➡️ B, C, D do not address the core requirement of making the method wireable.
Adjusted Correct Answers: A. Add @AuraEnabled(cacheable=true) to line 08 (assuming a typo, intended for Line 04).
Reason: The primary change needed is to add @AuraEnabled(cacheable=true) to the getRecentContacts method declaration (Line 04) to make it wireable in LWC. The cacheable=true parameter ensures the method’s results are cached, which is mandatory for @wire in LWC to optimize performance. The private getFiveMostRecent method does not need modification since it’s an internal call. This aligns with the Platform Developer II exam’s “User Interface” and “Apex Programming” domains.
Reference: Salesforce LWC Developer Guide - Call Apex Using @wire and AuraEnabled Annotation.
Additional Notes:
The correct implementation would modify Line 04 to @AuraEnabled(cacheable=true) public static List
An org has a requirement that an Account must always have one and only one Contact listed as Primary. So selecting one Contact will de-select any others. The client wants a checkbox on the Contact called 'Is Primary’ to control this feature. The client also wants to ensure that the last name of every Contact is stored entirely in uppercase characters. What is the optimal way to implement these requirements?
A. Write a Validation Rule on the Contact for the Is Primary logic and a before update trigger on Contact for the last name logic.
B. Write an after update trigger on Contact for the Is Primary logic and a separate before update trigger on Contact for the last name logic.
C. Write a single trigger on Contact for both after update and before update and callout to helper classes to handle each set of logic.
D. Write an after update trigger on Account for the Is Primary logic and a before update trigger on Contact for the last name logic.
Explanation:
✅ Correct Answer: C. Write a single trigger on Contact for both after update and before update and call out to helper classes to handle each set of logic 🧠
This is the optimal solution because it efficiently separates concerns while maintaining performance, scalability, and testability. Salesforce encourages developers to follow best practices by using a single trigger per object and delegating business logic to helper classes. This architecture ensures clean, modular code that is easier to maintain and extend.
The requirement to enforce only one Contact marked as "Is Primary" per Account needs to be handled after DML because it may require reviewing or updating other sibling contacts—records not necessarily in the trigger context. Therefore, it’s appropriate to handle this logic in the after update or after insert context, where all related records can be queried and modified accordingly.
On the other hand, the requirement to store the Contact’s last name in uppercase is best addressed in the before update or before insert context. This way, the data is modified before it hits the database, avoiding unnecessary updates or recursion. By combining both trigger events (before and after) in a single trigger, and delegating the logic to a helper class or service class, the solution remains clean and adheres to Salesforce's governor limits and coding standards.
❌ Option A: Write a Validation Rule on the Contact for the Is Primary logic and a before update trigger on Contact for the last name logic ⚠️
Using a Validation Rule to enforce the "only one primary contact per account" requirement is not viable. Validation rules cannot perform cross-record comparisons or updates. They can only evaluate conditions on the current record or related parent fields, not sibling records. Since this use case requires scanning all Contacts related to an Account to ensure only one is marked as primary, a validation rule cannot satisfy this constraint.
While the second part—converting the last name to uppercase—is fine in a before update trigger, relying on validation rules for complex data integrity enforcement that involves multiple records leads to limitations. This approach would leave the primary contact logic incomplete and prone to failure if multiple users attempt updates concurrently.
❌ Option B: Write an after update trigger on Contact for the Is Primary logic and a separate before update trigger on Contact for the last name logic 🧩
While technically correct, this approach violates the “one trigger per object” best practice. Having multiple triggers on the same object leads to maintenance problems, ordering conflicts, and increased risk of recursion or redundant logic. Salesforce does not guarantee trigger execution order when more than one trigger exists for the same object and event, which can lead to unpredictable behavior.
Moreover, splitting the logic into separate triggers for before update and after update increases complexity and decreases traceability. Even though this would work functionally, it is not optimal for long-term maintainability and testability. A unified trigger with clear delegation to helper classes is the more scalable solution.
❌ Option D: Write an after update trigger on Account for the Is Primary logic and a before update trigger on Contact for the last name logic ❌
This option mistakenly places the primary contact logic on the Account object, which is incorrect. The checkbox indicating whether a Contact is primary resides on the Contact record, and the logic that ensures only one is selected must execute in response to Contact changes, not Account changes. Using an Account trigger for this would require querying and acting upon unrelated child records and could introduce unnecessary complexity and performance issues.
Additionally, although the before update trigger for capitalizing the last name is appropriate, splitting the logic between two object triggers and two different scopes complicates the codebase. This design is not aligned with the principle of handling logic on the object that owns the field being changed.
Reference:
Trigger Context Variables
Trigger and Bulk Request Best Practices
Consider the Apex class below that defines a RemoteAction used on 2 Visualforce search page.

A. Option A
B. Option B
C. Option C
D. Option D
Explanation:
In the provided code, the class MyRemoter defines a static method marked with the @RemoteAction annotation:
@RemoteAction
global static Account getAccount(String accountName)
⇨ This method takes an accountName string as a parameter, performs a SOQL query to fetch the Account with that name, and returns it.
⇨ Since getAccount() is a static method, the correct way to call it in Apex is directly via the class name — MyRemoter.getAccount('TestAccount') — as shown in Option C. There's no need to instantiate the class to access a static method, which makes this the cleanest and most appropriate syntax.
⇨ Once the Account object is returned, it is compared using System.assertEquals() to verify the name matches "TestAccount". This is exactly the right approach to assert that the correct Account record was returned by the remote action.
❌ Why the Other Options Are Incorrect:
A)
Account a = controller.getAccount('TestAccount');
System.assertEquals('TestAccount', a.Name);
🔴 Incorrect because controller is undefined in the context. The code assumes the existence of a controller variable or object, which has not been declared. Furthermore, the method getAccount() is a static method in MyRemoter, so it should be called using the class name — not via an instance or another object.
B)
MyRemoter remote = new MyRemoter('TestAccount');
Account a = remote.getAccount();
System.assertEquals('TestAccount', a.Name);
🔴 Incorrect because it tries to instantiate the MyRemoter class with a constructor that accepts a string ('TestAccount'), but no such constructor exists. In the class code shown, only a default constructor (public MyRemoter() {}) is defined. This would cause a compilation error. Also, getAccount() is static, so it should not be called via an instance (remote.getAccount()).
D)
MyRemoter remote = new MyRemoter();
Account a = remote.getAccount('TestAccount');
System.assertEquals('TestAccount', a.Name);
🔴 Incorrect because even though it uses the correct parameter format ('TestAccount'), it still calls the static method getAccount() via an instance (remote.getAccount(...)) instead of the class itself. This is syntactically allowed in Apex but is discouraged and misleading, especially in test code. Static methods should always be invoked using the class name, not an object instance.
Reference:
Apex Developer Guide
JavaScript Remoting for Apex Controllers
There is an Apex controller and a Visualforce page in an org that displays records with a custom filter consisting of a combination of picklist values selected by the user. The page takes too long to display results for some of the input combinations, while for other input choices it throws the exception, "Maximum view state size limit exceeded”. What step should the developer take to resolve this issue?
A. Adjust any code that filters by picklist values since they are not indexed,
B. Remove instances of the transient keyword from the Apex controller to avoid the view state error.
C. Use a StandardSetController or SOQL LIMIT in the Apex controller to limit the number of records displayed at a time.
D. Split the layout to filter records in one Visualforce page and display the list of records in a second page using the same Apex controller.
Explanation:
❌ A. Adjust any code that filters by picklist values since they are not indexed: Picklist fields in Salesforce are indexed by default, so filtering on them is generally efficient. While indexing impacts query performance, it doesn’t directly address the view state size limit error, which is caused by excessive data stored in the page’s state. This option is incorrect as it doesn’t resolve the view state issue or significantly improve performance for large datasets.
❌ B. Remove instances of the transient keyword from the Apex controller to avoid the view state error: The transient keyword reduces view state by excluding variables from being serialized, which helps avoid the view state size limit error. Removing transient would increase the view state, worsening the issue, making this option incorrect.
✅ C. Use a StandardSetController or SOQL LIMIT in the Apex controller to limit the number of records displayed at a time: The “Maximum view state size limit exceeded” error occurs when the page’s state (data sent between client and server) exceeds 170 KB. A primary contributor is large datasets, such as lists of records stored in the controller. Using a StandardSetController enables pagination, limiting the number of records loaded at once (e.g., 20 per page), which reduces both view state size and page load time. Alternatively, a SOQL LIMIT clause in a custom controller can restrict the number of records retrieved, achieving a similar effect. This directly addresses both the performance and view state issues, making it the best solution.
❌ D. Split the layout to filter records in one Visualforce page and display the list in a second page using the same Apex controller: While splitting the UI across two pages might reduce the view state on the display page, it doesn’t inherently limit the data retrieved or processed by the controller. It adds complexity without directly addressing the root cause (large datasets in view state), making it less effective than option C.
🧩 Reason: Option C leverages StandardSetController or SOQL LIMIT to reduce the number of records handled, directly mitigating the view state size limit error and improving performance by loading fewer records at a time. This aligns with the Platform Developer II exam’s focus on “User Interface” and Visualforce optimization.
ℹ️ Reference: Salesforce Visualforce Developer Guide - StandardSetController and View State.
Universal Containers implements a private sharing model for the Convention Attendee co custom object. As part of a new quality assurance effort, the company created an Event_Reviewer_c user lookup field on the object. Management wants the event reviewer to automatically gain ReadWrite access to every record they are assigned to. What is the best approach to ensure the assigned reviewer obtains Read/Write access to the record?
A. Create a before insert trigger on the Convention Attendee custom object, and use Apex Sharing Reasons and Apex Managed Sharing.
B. Create an after insert trigger on the Convention Attendee custom object, and use Apex Sharing Reasons and Apex Managed Sharing.
C. Create criteria-based sharing rules on the Convention Attendee custom object to share the records with the Event Reviewers.
D. Create a criteria-based sharing rule on the Convention Attendee custom object to share the records with a group of Event Reviewers.
Explanation:
✅ Correct Answer: B — After insert trigger with Apex Sharing Reasons and Managed Sharing
🔐 Why this works:
When implementing Apex Managed Sharing, Salesforce requires that the record already exist in the database so it has a valid record ID. This ID is necessary for creating a custom Share record that links the record to the user in the Event_Reviewer__c field. Because of this, the logic to share the record must happen after the insert — which is why the correct place is an after insert trigger.
🛠 Managed Sharing gives full control over access logic in Apex. By using a custom Apex Sharing Reason, you can apply named reasons for the share (e.g., “Assigned Reviewer Access”), and admins can later manage them through the UI if needed. This also keeps sharing logic dynamic and scalable, suitable for future changes.
📚 Use Case Fit:
This solution supports the requirement that access is automatically granted when a user is assigned as a reviewer. It works with private sharing models, ensures proper access is granted without compromising security, and is admin-friendly due to its maintainability.
❌ A — Before insert trigger with Apex Managed Sharing
🚫 Why it's wrong:
In a before insert trigger, the record does not yet have a Salesforce ID, which is essential to create a valid Share object in Apex. Since Apex Managed Sharing requires the ParentId (record ID) to associate the shared record to the target user, this method fails technically. The trigger would attempt to share a record that doesn’t yet exist — leading to runtime errors or unintended behavior.
💡 Key Concept:
Sharing must occur after the database transaction, which makes this a clear architectural limitation of before triggers.
❌ C — Criteria-based sharing rule for Event Reviewers
🚫 Why it's wrong:
Criteria-based sharing rules can only apply access based on record field values — not based on dynamic user lookups like Event_Reviewer__c. You can’t configure them to assign access directly to the user listed in a lookup field. They also only support role, group, or public access, not individual user-based field references.
⚠️ Limitation:
They are designed for bulk sharing to groups of users, not one-to-one sharing based on lookup assignments. Therefore, they can’t fulfill the requirement to grant access dynamically to the user assigned.
❌ D — Share with a group of Event Reviewers
🚫 Why it's wrong:
This would share every Convention Attendee record with a static group of users, regardless of who is assigned as Event_Reviewer__c. This does not meet the requirement of only granting access to the specific assigned reviewer. Also, if reviewers change or rotate frequently, managing group membership would become cumbersome and error-prone.
📉 Problem:
It lacks flexibility, introduces overhead, and fails to dynamically reflect the lookup field changes.
Reference:
Apex Managed Sharing
A Lightning web component exists in the system and displays information about the record
in context as a medal. Salesforce administrators need to use this component
within the Lightning App Builder,
Which two settings should the developer configure within the xml resource file?
(Choose 2 answers)
A. Specify the target to be lightning_RecordPage
B. Set the IsExposed=d attribute to true.
C. Specify the target to be lightning_AppPage
D. Set the IsVisible attribute to true
Explanation:
To enable Salesforce administrators to use a Lightning Web Component (LWC) within the Lightning App Builder, the developer must configure the component’s XML configuration file (e.g., myComponent.js-meta.xml) to expose the component and specify where it can be used. The question asks for the two settings needed to achieve this, specifically for a component that displays record information as a modal in the context of a record page. Let’s evaluate the options.
✅ A. Specify the target to be lightning_RecordPage
The lightning_RecordPage target in the LWC’s XML configuration file indicates that the component can be used on a Lightning Record Page in the Lightning App Builder. Since the component displays information about the record in context (implying it’s used on a record page), this target is necessary to make the component available for administrators to add to record pages. This setting is configured in the
🧩 Reference: Salesforce LWC Developer Guide - Configure Components for Lightning App Builder.
✅ B. Set the IsExposed attribute to true.
The isExposed attribute in the XML configuration file must be set to true to make the LWC available for use in tools like the Lightning App Builder. Without this setting, the component remains private and cannot be accessed or added by administrators in the App Builder, regardless of the specified targets. This is a critical setting for exposing the component for administrative use.
🧩 Reference: Salesforce LWC Developer Guide - Expose a Component.
❌ C. Specify the target to be lightning_AppPage
The lightning_AppPage target allows the component to be used on a Lightning App Page in the Lightning App Builder. While this is a valid target, the question specifies that the component displays record-specific information as a modal, suggesting it is intended for use on a record page (where record context is available) rather than an app page (which is typically for custom applications without a specific record context). Thus, this target is not relevant to the described use case.
🧩 Reference: Salesforce LWC Developer Guide - Component Configuration.
❌ D. Set the IsVisible attribute to true
There is no isVisible attribute in the LWC XML configuration file. The correct attribute is isExposed, which controls whether the component is available in the Lightning App Builder and other contexts. This option is incorrect because it references a nonexistent attribute, likely a distractor in the exam context.
🧩 Reference: Salesforce LWC Developer Guide - Metadata Configuration.
✅ Correct Answers: A. Specify the target to be lightning_RecordPage and B. Set the IsExposed attribute to true.
Reason: To make the LWC available in the Lightning App Builder for use on a record page, the developer must set isExposed="true" in the XML configuration file to expose the component and include lightning_RecordPage in the
| Page 1 out of 21 Pages |
| 1234567 |
Our new timed 2026 Salesforce-Platform-Developer-II practice test mirrors the exact format, number of questions, and time limit of the official exam.
The #1 challenge isn't just knowing the material; it's managing the clock. Our new simulation builds your speed and stamina.
You've studied the concepts. You've learned the material. But are you truly prepared for the pressure of the real Salesforce Certified Platform Developer II (SP25) exam?
We've launched a brand-new, timed Salesforce-Platform-Developer-II practice exam that perfectly mirrors the official exam:
✅ Same Number of Questions
✅ Same Time Limit
✅ Same Exam Feel
✅ Unique Exam Every Time
This isn't just another Salesforce-Platform-Developer-II practice questions bank. It's your ultimate preparation engine.
Enroll now and gain the unbeatable advantage of:
✅ Covers advanced Apex, integration patterns, asynchronous processes, and design patterns
✅ Realistic, exam-level questions based on the latest Salesforce updates
✅ Detailed explanations for every answer — know not just what’s right, but why
✅ Helps you master real-world problem-solving, not just memorize facts
✅ Unlimited test resets + performance tracking
Copyright © - All Rights Reserved