Total 202 Questions
Last Updated On : 8-Jul-2026

A user receives the generic "An internal server error has occurred” while interacting with a custom Lightning component. What should the developer do to ensure a more meaningful message?
A. Add an onerror event handler to the tag.
B. Add an error-view component to the markup.
C. Use platform events to process the error
D. Use an AuraHandledexception in a try-catch block.
Explanation:
✅ Correct Answer: D
The best way to provide a meaningful error message to the user when an Apex method fails is to throw an AuraHandledException from within a try-catch block in your Apex controller. This special type of exception allows you to define a custom error message that gets passed to the client-side Lightning component, rather than the default “An internal server error has occurred.” By catching errors and re-throwing them as AuraHandledException, you can control what message is sent to the front end, which then can be displayed via a toast or a component-based error display. This is the standard and recommended way in Salesforce to surface user-friendly messages from Apex code in Lightning.
try {
// logic
} catch(Exception e) {
throw new AuraHandledException('Something went wrong. Please contact support.');
}
❌ Incorrect Answers:
❌ A) Add an onerror event handler to the template tag.
While handling client-side errors is useful in JavaScript, the onerror attribute is not supported on the template tag in LWC or Aura. Lightning components do not bubble server-side Apex errors through onerror like traditional HTML or JavaScript DOM elements. Even if it were supported, it wouldn't capture Apex-specific exceptions unless they're already exposed correctly from the server. This option reflects a misunderstanding of how error propagation works in Lightning Web Components, particularly in the context of Apex method failures.
❌ B) Add an error-view component to the markup.
An error-view component doesn't exist by default in Salesforce. You would need to build a custom one yourself. Simply adding such a component to your markup won’t automatically catch and display backend errors. Without proper error handling in Apex (like using AuraHandledException), your frontend won’t even receive the correct error messages to pass into such a component. So, while a custom error-view can be helpful, it’s not a replacement for proper server-side error handling, which is the root cause of the “internal server error” message.
❌ C) Use platform events to process the error.
Platform events are designed for event-driven architecture and are used to communicate between systems asynchronously. They are not meant for immediate error handling in Lightning components. Platform events do not provide real-time responses to user actions and wouldn't help show a meaningful error message in place of the default internal server error. Additionally, implementing this approach would be over-engineered for a simple use case like exception messaging. This option is irrelevant to the current context of Apex error feedback in a user interface.
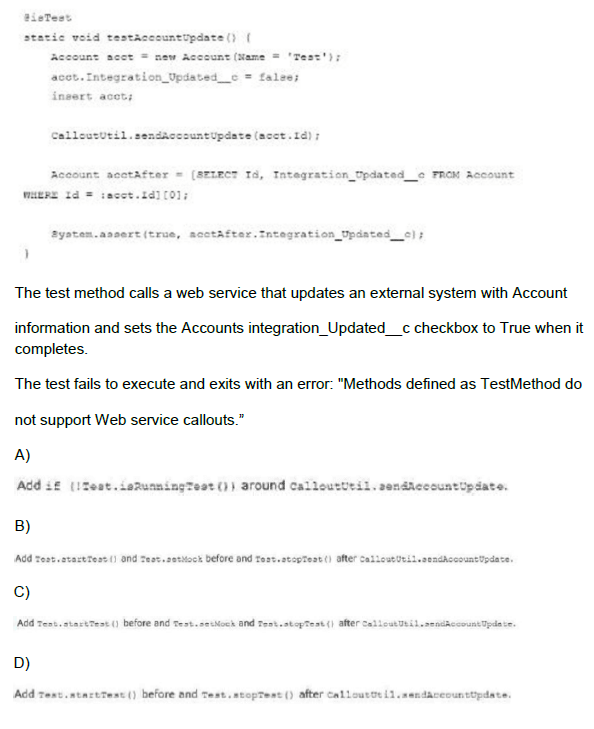
Refer to the test method below:
A. Option A
B. Option B
C. Option C
D. Option D
Explanation:
In Apex, test methods cannot perform real HTTP callouts. To test functionality that includes a callout, Salesforce requires you to use Test.setMock() along with Test.startTest() and Test.stopTest() to simulate the callout behavior.
Here’s what needs to happen:
Test.setMock() tells the test framework to use a mock response for a given HTTP callout.
Test.startTest() isolates the test’s execution context, ensuring that governor limits are reset.
Test.stopTest() ensures any asynchronous and final operations (like callouts) are executed and completed before assertions are made.
By placing Test.setMock() after startTest() and before the callout, and using stopTest() after the callout, the test can simulate the integration without performing an actual web service call, preventing the "Web service callouts not supported" error.
Test.startTest();
Test.setMock(HttpCalloutMock.class, new YourMockResponseClass());
CalloutUtil.sendAccountUpdate(acct.Id);
Test.stopTest();
This approach is Salesforce best practice for testing callouts.
❌ Incorrect Answers:
A) Add if (!Test.isRunningTest()) around CalloutUtil.sendAccountUpdate.
This option attempts to bypass the callout during tests by checking if the code is running in a test context. While Test.isRunningTest() does return true in test methods, this strategy essentially skips the logic you're trying to test, which defeats the purpose of the unit test. It doesn’t verify the correctness of the code path or simulate the response from the callout, and leaves important logic untested. Salesforce recommends mocking callouts, not bypassing them, to maintain test reliability and coverage.
B) Add Test.startTest() and Test.setMock() before and Test.stopTest() after CalloutUtil.sendAccountUpdate.
This is almost correct but it's missing a critical detail: the order of Test.setMock() matters. It must be called after Test.startTest() to ensure the mock context is properly initialized. If you call setMock() before startTest(), it may not function correctly depending on the Salesforce runtime behavior. This can cause the mock to be ignored and a real callout attempted — which leads to the same error. Option C correctly reflects the sequence: startTest() → setMock() → perform callout → stopTest().
D) Add Test.startTest() before and Test.stopTest() after CalloutUtil.sendAccountUpdate.
This option correctly uses startTest() and stopTest(), but omits Test.setMock(), which is essential. Without mocking, the test will still attempt a real HTTP callout, which is not permitted in test context and will fail with the same error. Using startTest() and stopTest() is not enough on its own — a mock class that implements HttpCalloutMock must be registered using Test.setMock() to simulate a response. Therefore, this solution is incomplete and will not solve the problem.
Which interface needs to be implemented by an Aura component so that it may be displayed in modal dialog by clicking a button on a Lightning record page?
A. farce:lightningEditRAation
B. lightning:editiction
C. force:lightningQuickhction
D. lightning:quickAction
Explanation:
To determine which interface needs to be implemented by an Aura component to be displayed in a modal dialog when a button is clicked on a Lightning record page, we need to consider Salesforce's Lightning framework and its support for quick actions. A quick action on a Lightning record page can open a modal dialog to perform custom operations, and certain interfaces enable Aura components to be invoked in this manner. Let's evaluate each option based on Salesforce documentation and best practices.
Correct Answer: D. lightning:quickAction
Option D, lightning:quickAction, is the correct interface to implement for an Aura component to be displayed in a modal dialog when triggered by a button on a Lightning record page. This interface allows the component to be used as a custom quick action, which Salesforce renders in a modal popup. By implementing lightning:quickAction, the component can access the record context and interact with the page, making it suitable for tasks like data entry or custom logic. This is a standard practice in Salesforce development, especially for the Platform Developer II exam, where understanding Lightning component integration is key. The interface ensures the component is properly formatted and compatible with the quick action framework.
Incorrect Answer:
Option A: farce:lightningEditAction
Option A, farce:lightningEditAction, appears to be a typographical error or non-existent interface (likely intended as force:lightningEditAction or similar). There is no such interface in the Salesforce Lightning framework. Even if corrected to a similar name, no standard interface like force:lightningEditAction exists for enabling modal dialogs via quick actions. This option does not align with Salesforce's documented interfaces for Aura components, making it invalid for the intended purpose of displaying a component in a modal dialog on a Lightning record page.
Option B: lightning:editAction
Option B, lightning:editAction, is not a recognized interface in the Salesforce Lightning namespace. The lightning namespace includes components and utilities, but no lightning:editAction interface exists for enabling a component to be displayed as a quick action in a modal dialog. This option might be confused with editing-related components or actions, but it lacks the specific functionality required to integrate with quick actions on a Lightning record page. As a result, it is not a viable choice for this scenario.
Option C: force:lightningQuickAction
Option C, force:lightningQuickAction, is not a valid interface in the Salesforce Aura framework. The force namespace includes utilities like force:recordData for record access, but no force:lightningQuickAction interface exists to enable a component as a quick action in a modal dialog. This might be a misinterpretation of the lightning:quickAction interface or related features. Without official support, this option cannot be used to display an Aura component in a modal dialog when a button is clicked on a Lightning record page.
Reference:
Salesforce Lightning Components Basics
What are three reasons that a developer should write Jest tests for Lightning web
components?
(Choose 3 answers)
A. To test a component's non-public properties.
B. To test basic user interaction
C. To verify the DOM output of a component
D. To test how multiple components work together
E. To verify that events fire when expected
Explanation:
Writing Jest tests for Lightning Web Components (LWCs) is a critical practice in Salesforce development to ensure code quality, functionality, and reliability. Jest, a JavaScript testing framework, is integrated into the Salesforce LWC development environment to facilitate unit testing. The goal is to validate component behavior, interactions, and output while adhering to best practices. Let's evaluate each option to identify the three most valid reasons for writing Jest tests for LWCs.
Correct Answer:
B. To test basic user interaction
Testing basic user interaction with Jest ensures that a Lightning Web Component responds correctly to user actions such as clicks, inputs, or form submissions. By simulating these interactions (e.g., using fireEvent or triggerEvent), developers can verify that the component's logic executes as intended. This is crucial for user-facing components, as it confirms the UI behaves predictably, enhancing user experience. For the Platform Developer II exam, understanding how to test interactivity is key, making this a primary reason to use Jest in LWC development.
C. To verify the DOM output of a component
Verifying the DOM output of a component with Jest allows developers to ensure the rendered HTML matches the expected structure and content. Using tools like @salesforce/sfdx-lwc-jest and utilities such as createElement, developers can render components and assert against the DOM using query selectors. This is essential for validating visual elements, accessibility, and layout, which are critical for LWC reliability. This testing approach aligns with Salesforce best practices and is a fundamental reason to write Jest tests for LWCs.
E. To verify that events fire when expected
Verifying that events fire when expected is a vital reason to write Jest tests, as LWCs often rely on custom events for communication between components. By testing event emission and handling (e.g., using dispatchEvent and event listeners), developers can ensure the component's event-driven logic works correctly. This is particularly important in complex applications where event propagation impacts functionality. For the Platform Developer II exam, mastering event testing with Jest is a key skill, making it a significant justification for testing.
Incorrect Answer:
Option A: To test a component's non-public properties
Testing a component's non-public properties (e.g., private fields or methods) is generally not a recommended reason to write Jest tests for LWCs. Salesforce encourages testing public APIs and observable behavior rather than internal implementation details, as non-public properties can change without notice. Jest tests should focus on the component's external interface and functionality, not its private state. While technically possible, this approach violates encapsulation principles and is not a primary goal, making it less relevant for the Platform Developer II exam context.
Option D: To test how multiple components work together
Testing how multiple components work together is more suited to integration testing rather than unit testing with Jest. Jest is designed for unit testing individual LWCs in isolation, using mocks or stubs for dependencies. Testing component interactions typically requires a higher-level testing framework or manual testing in a sandbox, as Jest lacks built-in support for end-to-end scenarios. While important, this is outside the scope of Jest's primary purpose for LWCs, making it an incorrect focus for this question.
Reference:
Test Lightning Web Components
A developer wrote the following method to find all the test accounts in the org: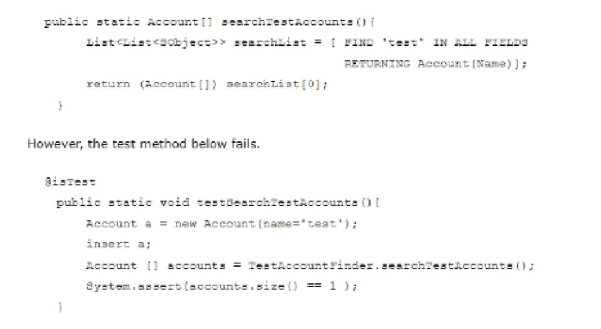
What should be used to fix this failing test?
A. Test. fixsdSsarchReaulta [) method to set up expected data
B. @isTest (SeeAllData=true) to access org data for the test
C. @testsetup method to set up expected data
D. Teat.loadData to set up expected data
Explanation:
The reason this test fails is because it relies on a SOQL FIND clause, which uses SOSL (Salesforce Object Search Language) to search across all fields. SOSL relies on the search index, which is not populated for test data by default in Apex unit tests. In a typical test context, even if you insert a record, it is not searchable via SOSL unless using @isTest(SeeAllData=true) — which gives access to existing org data that is already indexed.
In this situation, the inserted account record with the name "test" isn't appearing in SOSL results during the test because the SOSL engine doesn't index test-created data. By using @isTest(SeeAllData=true), you can access pre-existing indexed data that SOSL can find, which will allow the test to pass only if that data already exists in the org.
⚠️ Important Note: Using SeeAllData=true is not best practice in most cases, but it is required when you need access to the org’s actual data, including SOSL-indexed records, which test-inserted data does not qualify as.
❌ Incorrect Answers:
A) Test.fixSearchResults() method to set up expected data
There is no such method as Test.fixSearchResults() in Apex or Salesforce’s test framework. This answer seems fabricated or confused with another feature. The only ways to control data in tests are via setup methods, data loading, mocking, or SeeAllData. There’s no built-in method to "fix" or simulate SOSL behavior in unit tests.
C) @testSetup method to set up expected data
Using @testSetup is a great way to create reusable test data across multiple test methods but it doesn’t change the behavior of SOSL indexing. Records inserted in @testSetup are still not indexed for SOSL in the test context. So even if you create the account in a setup method, FIND 'test' IN ALL FIELDS will not return it. This would still result in a failed assertion unless you use SeeAllData=true.
D) Test.loadData to set up expected data
Test.loadData() is used to load data from static .csv files into your test context. Like @testSetup, this method helps set up test records, but the data is still not indexed for SOSL queries. So, even if you load an account with the name "test", it will not appear in a FIND search during a test. Only data from the real org (accessible via SeeAllData=true) is indexed and searchable via SOSL.
🔗 Reference:
Trailhead – Apex Testing
Salesforce – SeeAllData=true
A developer is asked to replace the standard Case creation screen with a custom screen that takes users through a wizard before creating the Case. The org only has users running Lightning Experience. What should the developer override the Case New Action with to satisfy the requirements?
A. Lightning Page
B. Lightning Record Page
C. Lightning Component
D. Lightning Flow
Explanation:
To build a multi-step wizard for Case creation in Lightning Experience, the best and most declarative tool is Lightning Flow (Screen Flow). Flows allow developers and admins to design guided, user-friendly wizards without needing to write extensive code. These flows can include screens, decision points, and logic to gather input and perform record creation.
In this scenario:
You need to override the "New" button for the Case object.
The org is running Lightning Experience only, which supports overriding standard actions with Screen Flows.
You can create a Screen Flow, then go to Object Manager → Case → Buttons, Links, and Actions → New → Override with Flow.
This gives you full control over the Case creation process and satisfies the need for a custom, wizard-like interface.
❌ Incorrect Answers:
A) Lightning Page
A Lightning Page is a type of layout created using the Lightning App Builder. It defines where and how components appear on a record or app page, but it cannot be used to override buttons like the "New" action. It doesn't support user interaction logic or form flow, so it can’t function as a wizard.
B) Lightning Record Page
This is a more specific type of Lightning Page assigned to an object’s record view. Like a standard Lightning Page, it's used for layout and design purposes but not for overriding button behavior or implementing guided user interactions. It won't help create a custom wizard to replace the Case creation screen.
C) Lightning Component
While Lightning Components (Aura or LWC) can be used for advanced customizations and can override buttons, building a multi-step wizard from scratch in a component requires significant code and effort. Salesforce best practice recommends using Flows for such use cases unless the flow has limitations. Also, for standard action overrides like "New," Flows are directly supported, making this a simpler and more maintainable solution.
🔗 Reference:
Salesforce Help – Customize Standard Buttons
Salesforce Flow Builder Guide
Trailhead – Build Flows with Flow Builder
A company has a web page that needs to get Account record information, such as name, website, and employee number. The Salesforce record 1D is known to the web page and it uses JavaScript to retrieve the account information. Which method of integration is optimal?
A. Apex SOAP web service
B. SOAP API
C. Apex REST web service
D. REST API
Explanation:
To determine the optimal method for a web page to retrieve Account record information (e.g., name, website, employee number) using JavaScript with a known Salesforce record ID, we need to consider integration options that are efficient, secure, and suitable for client-side JavaScript execution. The solution should allow the web page to interact with Salesforce data via a RESTful or SOAP-based interface, balancing ease of use, performance, and developer familiarity with JavaScript.
Correct Answer: D. REST API
Option D, REST API, is the optimal method for this scenario. The Salesforce REST API allows a web page to retrieve Account record information using JavaScript via HTTP requests (e.g., using fetch or axios) with a known record ID. It provides a lightweight, stateless interface with JSON responses, which is ideal for client-side integration. The API supports standard objects like Account and can be secured with OAuth, ensuring data access is controlled. This approach aligns with modern web development practices and is well-documented, making it a practical choice for the Platform Developer II exam context, especially given JavaScript's compatibility with REST.
Incorrect Answer:
Option A: Apex SOAP web service
Option A, Apex SOAP web service, involves creating a custom SOAP-based service in Apex to expose Account data. While feasible, it requires generating WSDL files and handling XML responses, which are less convenient for JavaScript developers compared to JSON. The complexity of SOAP (e.g., strict typing, larger payloads) and the need for additional client-side libraries make it less efficient for a web page. This method is better suited for enterprise integrations rather than simple client-side JavaScript calls, making it suboptimal here.
Option B: SOAP API
Option B, SOAP API, is Salesforce's native SOAP-based API for accessing data, including Account records. However, it relies on XML and requires a WSDL client, which adds overhead for JavaScript integration on a web page. Parsing XML responses and managing the API's complexity can be challenging without additional libraries, and it is less intuitive than REST for modern web development. While secure and robust, its lack of native JavaScript compatibility makes it a less optimal choice compared to REST API for this use case.
Option C: Apex REST web service
Option C, Apex REST web service, involves creating a custom REST endpoint in Apex to retrieve Account data. This allows tailored responses and business logic but requires server-side development, deployment, and maintenance within Salesforce. While it can return JSON (suitable for JavaScript), it introduces additional complexity and overhead compared to using the standard REST API, which already provides Account access. For a simple retrieval with a known ID, the native REST API is more efficient, making this option less optimal unless custom logic is strictly needed.
Reference:
Salesforce REST API Developer Guide
Salesforce SOAP API Guide
Which two best practices should the developer implement to optimize this code?
Choose 2
answers
A. Change the trigger context to after update, after insert
B. Remove the DML statement.
C. Use a collection for the DML statement.
D. Query the Driving-Structure_C records outside of the loop
Explanation:
✅ C) Use a collection for the DML statement
One of the core Apex best practices is to avoid performing repeated DML operations inside a loop. Instead, accumulate the records into a collection (e.g., List<>) and perform a single DML operation after the loop completes. This improves performance and avoids exceeding governor limits (especially the 150 DML statements per transaction limit).
Before:
for(Account acc : Trigger.new) {
update acc;
}
After:
List
for(Account acc : Trigger.new) {
accountsToUpdate.add(acc);
}
update accountsToUpdate;
✅ D) Query the Driving-Structure__c records outside of the loop
Querying records inside a loop causes SOQL inside loop issues and can easily hit the 100 SOQL queries per transaction governor limit. Instead, gather all needed IDs first, then perform one SOQL query outside the loop to fetch related records.
Before:
for(Account acc : Trigger.new) {
Driving_Structure__c ds = [SELECT Id FROM Driving_Structure__c WHERE Account__c = :acc.Id];
}
After:
Set
for(Account acc : Trigger.new) {
accountIds.add(acc.Id);
}
Map
[SELECT Id, Account__c FROM Driving_Structure__c WHERE Account__c IN :accountIds]
);
This bulkifies the code and keeps it governor-limit safe.
❌ Incorrect Answers:
A) Change the trigger context to after update, after insert
The trigger context (before vs after insert/update) depends on what you need to do in the logic:
Use before triggers when you need to modify field values before they’re saved.
Use after triggers when you need to access record IDs or make related object updates.
Changing the context without understanding the business logic could break functionality. This option is not a general best practice unless there's a clear reason based on trigger requirements.
B) Remove the DML statement
Completely removing the DML statement would likely prevent the necessary changes to the records from being saved to the database. The goal is to optimize the DML (by using collections and avoiding repetition), not eliminate it unless it’s truly unnecessary — which is unlikely in a trigger context designed to update data.
🔗 Reference:
Apex Developer Guide – Bulk Trigger Best Practices
Trailhead – Apex Triggers
SOQL Best Practices
An environment has two Apex triggers: an after-update trigger on Account and an afterupdate
trigger on Contact.
The Account after-update trigger fires whenever an Account's address is updated, and it
updates every associated Contact with that address. The Contact after-update trigger fires
on every edit, and it updates every Campaign Member record related to the Contact with
the Contact's state.
Consider the following: A mass update of 200 Account records’ addresses, where each
Account has 50 Contacts. Each Contact has one Campaign Member. This means there are
10,000 Contact records across the Accounts and 10,000 Campaign Member records
across the contacts.
What will happen when the mass update occurs?
A. There will be no error and all updates will succeed, since the limit on the number of records processed by DML statements was not exceeded.
B. The mass update of Account address will succeed, but the Contact address updates will fail due to exceeding number of records processed by DML statements.
C. There will be no error, since each trigger fires within its own context and each trigger does not exceed the limit of the number of records processed by DML statements.
D. The mass update will fail, since the two triggers fire in the same context, thus exceeding the number of records processed by DML statements.
Explanation:
To determine the outcome of a mass update of 200 Account records' addresses, where each Account has 50 Contacts (totaling 10,000 Contacts) and each Contact has one Campaign Member (totaling 10,000 Campaign Members), we need to analyze the behavior of the two Apex triggers in the context of Salesforce governor limits. The Account after-update trigger updates all associated Contacts with the Account's address, and the Contact after-update trigger updates all related Campaign Members with the Contact's state. Key governor limits to consider include the maximum number of records processed by DML statements (10,000) and the context in which triggers execute.
Correct Answer: C. There will be no error, since each trigger fires within its own context and each trigger does not exceed the limit of the number of records processed by DML statements
Option C is correct because Salesforce processes triggers in separate contexts based on the object and trigger type. The Account after-update trigger fires first, updating 10,000 Contact records in batches (due to bulk processing). Each batch respects the 10,000 DML row limit within its context. Subsequently, the Contact after-update trigger fires for the updated Contacts, updating 10,000 Campaign Member records, again within its own context and respecting the limit. Since each trigger operates independently and the total DML rows per context do not exceed 10,000, the mass update succeeds without errors. This aligns with Salesforce's bulkified trigger design and governor limit handling.
Incorrect Answer:
Option A: There will be no error and all updates will succeed, since the limit on the number of records processed by DML statements was not exceeded
Option A is incorrect because it oversimplifies the scenario. While the total number of records updated (10,000 Contacts + 10,000 Campaign Members = 20,000) might suggest a limit issue, Salesforce processes triggers in separate contexts per object. The Account trigger handles 10,000 Contact updates, and the Contact trigger handles 10,000 Campaign Member updates, each within its own 10,000-row DML limit. The explanation in Option A fails to clarify this context separation, making it misleading despite the correct outcome.
Option B: The mass update of Account address will succeed, but the Contact address updates will fail due to exceeding number of records processed by DML statements
Option B is incorrect because it assumes the Contact address updates (handled by the Account trigger) will fail due to exceeding the DML limit. However, Salesforce bulkifies the Account trigger, processing the 10,000 Contact updates in batches within the 10,000-row limit per context. The subsequent Contact trigger updates 10,000 Campaign Members, also within its limit. There is no failure point here, as each trigger's DML operations are constrained by its own context, allowing all updates to succeed.
Option D: The mass update will fail, since the two triggers fire in the same context, thus exceeding the number of records processed by DML statements
Option D is incorrect because it misinterprets trigger execution contexts. Salesforce does not execute the Account and Contact after-update triggers in the same context; each trigger runs in its own context based on the object being updated. The Account trigger's 10,000 Contact updates and the Contact trigger's 10,000 Campaign Member updates are processed separately, each adhering to the 10,000-row DML limit. Thus, the total of 20,000 records does not cause a failure, as the limits are applied per context, not cumulatively across triggers.
Reference:
Salesforce Apex Developer Guide: "Triggers" - Section on Trigger Context.
A developer is writing a Jest test for a Lightning web component that conditionally displays child components based on a user's checkbox selections. What should the developer do to properly test that the correct components display and hide for each scenario?
A. Create a new describe block for each test.
B. Reset the DOM after each test with the after Each() method.
C. Add a teardown block to reset the DOM after each test.
D. Create a new jsdom instance for each test.
Explanation:
When testing Lightning Web Components (LWC) with Jest, it's essential to ensure that each test case runs in isolation. If the DOM isn't reset between tests, leftover elements or mutated state from a previous test can cause false positives, unpredictable failures, or test flakiness.
The recommended and correct way to reset the DOM is to use Jest’s afterEach() hook to clear the DOM and component state after each test:
afterEach(() => {
// clean up DOM
while (document.body.firstChild) {
document.body.removeChild(document.body.firstChild);
}
});
This ensures that each test starts with a clean DOM, which is especially critical when testing conditional rendering (like showing/hiding child components based on checkbox selection). Failing to do this can cause multiple test cases to interfere with each other.
❌ Incorrect Answers:
A) Create a new describe block for each test
Using a separate describe block for each test is not required and not the correct way to isolate DOM behavior. describe blocks are used to group tests and apply shared beforeEach() or afterEach() logic, but they don’t themselves clean up the DOM. This approach adds unnecessary complexity and doesn't address the core problem of DOM state persistence.
C) Add a teardown block to reset the DOM after each test
There is no teardown block in Jest. Jest uses beforeEach() and afterEach() for setup and teardown, respectively. "Teardown block" is an incorrect or non-existent terminology in Jest's lifecycle methods. This option may sound valid but is not syntactically or conceptually correct for Jest.
D) Create a new jsdom instance for each test
While it's theoretically possible to spin up a new jsdom instance for each test, it's overkill and not necessary in typical Jest testing for LWC. Jest automatically runs within a single shared jsdom environment, and you can reset the DOM simply by clearing document.body. Creating a new jsdom would complicate your tests and go against Salesforce's recommended Jest testing practices.
🔗 Reference:
Salesforce LWC Jest Test Guide
Jest Documentation – Setup and Teardown
Trailhead – LWC Testing with Jest
| Page 3 out of 21 Pages |
| 1234567 |
| Salesforce-Platform-Developer-II Practice Test Home |
Our new timed 2026 Salesforce-Platform-Developer-II practice test mirrors the exact format, number of questions, and time limit of the official exam.
The #1 challenge isn't just knowing the material; it's managing the clock. Our new simulation builds your speed and stamina.
You've studied the concepts. You've learned the material. But are you truly prepared for the pressure of the real Salesforce Certified Platform Developer II (SP25) exam?
We've launched a brand-new, timed Salesforce-Platform-Developer-II practice exam that perfectly mirrors the official exam:
✅ Same Number of Questions
✅ Same Time Limit
✅ Same Exam Feel
✅ Unique Exam Every Time
This isn't just another Salesforce-Platform-Developer-II practice questions bank. It's your ultimate preparation engine.
Enroll now and gain the unbeatable advantage of:
Copyright © - All Rights Reserved